CAR Motorsports Gods Head Emblem Shipment Update

Gap

Gap,, What do you guy's mean, the gap between the 3m adhesive and the badge or the adhesive not sticking? Mine whent on good but the hardest part was getting the old adhesive off without scratching around the outer edge. I'm going out right now to wax it again. in the long run it turned out perfect.:bows:
 
The Marauder image on the Gods Head Emblems was designed to duplicate the Maruader image on the wheel center cap/emblem not to duplicate a headrest embossment. That design development specification was talked about from the beginning of the project. End result is all exterior emblems are seamlessly integrated.

Rich
CAR Motorsports
 
BIGGDOGG said:
The Marauder image on the Gods Head Emblems was designed to duplicate the Maruader image on the wheel center cap/emblem not to duplicate a headrest embossment. That design development specification was talked about from the beginning of the project. End result is all exterior emblems are seamlessly integrated.

Rich
CAR Motorsports

Rich,

I think the seat back was mentioned merely to show how Mercury intends the God's head to be oriented. Of course, you can never tell with the wheels, as they rotate through all angles.
 
B.C. Bake said:
Gap,, What do you guy's mean, the gap between the 3m adhesive and the badge or the adhesive not sticking? Mine whent on good but the hardest part was getting the old adhesive off without scratching around the outer edge. I'm going out right now to wax it again. in the long run it turned out perfect.:bows:

In my case, there was a definite gap between the adhesive and the trunk surface, both at the upper left and lower right of the emblem. The gap was a bit over 1mm at each location. See my post above for how I remedied this.
 
Meteorite said:
Rich,

I think the seat back was mentioned merely to show how Mercury intends the God's head to be oriented. Of course, you can never tell with the wheels, as they rotate through all angles.

Meteorite,

I am referring to the image itself, not the rotation of the image. It is a different image on the wheel caps then is employed on the interior embossment. The most marked difference being the neck to head angle of attachment. The interior embossments we have seen provide a fairly straight neck with the face looking straight at the 9 oclock position. Again, two different images with the interior and wheel caps. Who knows what Mercury intended and who in Mercury attended to the images and orientation/positioning. Best we can tell, the face would be facing directly to the left. Makes for a good quessing game though....

Thanks, Rich
CAR Motorsports
 
Meteorite said:
In my case, there was a definite gap between the adhesive and the trunk surface, both at the upper left and lower right of the emblem. The gap was a bit over 1mm at each location. See my post above for how I remedied this.
Thanks Meteorite, and Krytin my apologies. I know Rich makes first class stuff, but I posted based on my dry fitting the badge to the trunk lid. With Mercury facing just slightly down with his neck at the 5 o'clock position, I seemed to have no movement at all.

My final install experience is the same as yours and Meteorites. With the face at the "8:40" position, I got almost no movement. I fitted the badge, but like you could not get contact at the 11 o'clock and 5 o'clock positions. But it was just a fraction of an inch. The more I rotated the badge counter clockwise during dry fit the better it fit, but I did not want him looking down.

I did get pretty good contact at the top left, but the bottom right would not stick completely. I figure I have about 90-95% of the sticky contacting the paint, so it's not going anywhere. I surprised myself by doing a good job getting the old one off and the paint cleaned up.

I also figure the bottom right gap at 1 mm. maybe as little as a 32nd. By pushing like hell and holding it for a good 3 minutes I got the top left to engage pretty much.

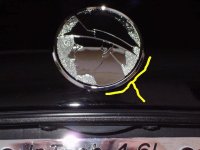
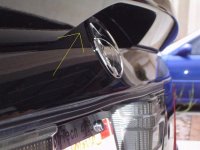
Here are some pics, center, left and right. You can see if you _really_ look close that it's closer to the car on the lower left than it is on the lower right. The yellow lines show where there is some lack of contact. The left side view yellow arrow has contact but not as storng as the center. The heavy yellow is no contact for about 1/4" in at 5 o'clock.

But, the bottom line is the ONLY way you can see the very slight gap is to put the trunk lid up and look under the badge, and you will see the slight lift to the lower right.

Honestly, I wish I had 100% contact, but A) it looks very nice, much nicer than the pot metal thing it replaced, B) it's not going anywhere once it sets up, and C) You can't tell it's not fit perfectly from left right or center unless you get down on your knees and look up.

Like I said, I could have rotated it more, but this is as "down facing" as I wanted to go. Ideally I would have turned it back another 1/8" clockwise, but I think it looks about right.

Meteorite, I have some black RTV that I may be able to get up in there, but it's so close I'm not sure how I'll do it neatly and may not bother.

Thanks,

Norm


attachment.php
 

Attachments

  • Badge Center.jpg
    Badge Center.jpg
    52.5 KB · Views: 44
  • Badge Left.jpg
    Badge Left.jpg
    50.4 KB · Views: 20
  • Badge right.jpg
    Badge right.jpg
    56.1 KB · Views: 26
Last edited:
Back
Top