Stroker Short Block Project with Centri SC

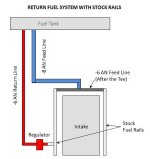
Going return fuel system is looking more and more likely. I've done a bit of reading, but I still don't understand certain things. Can you guys help me with these questions.

  1. Would I need to change fuel rails? Something about the FRPS (Fuel Rail Pressure Sensor) that I don't understand. Or is it that our fuel rails have a "dead end"?
    • If I do need to change fuel rails, I read that CPR makes rails for the Marauder, but need to be modified and that they push into the injectors causing fuel leaks....
    • I was thinking maybe using Cobra rails, but it sounded like these have the FRPS on the wrong side (?)
  2. Is it best to modify a fuel tank hat or to buy something already made for a return setup? I am considering the Walbro 400.
  3. Would I wire the new pump in the same manner as the old? It seems it okay to leave the FPDM (Fuel Pump Drive Module) connected b/c this gets removed in the tune.
Thanks!

Yes you will need new rails , i would go Fore , or Division X (they both have provisions for frps), CPR is out of business , your only option is to mod a fuel hat , no one makes one for our cars , you can't go return and leave the fpdm in place the returnless system is pulse with modulated meaning the fpdm controls the flow of the returnless system by varying the voltage to the pump.

The new pump will be wired directly to the battery via inline fuse , and relays.
 
Yes you will need new rails , i would go Fore , or Division X (they both have provisions for frps), CPR is out of business , your only option is to mod a fuel hat , no one makes one for our cars , you can't go return and leave the fpdm in place the returnless system is pulse with modulated meaning the fpdm controls the flow of the returnless system by varying the voltage to the pump.


The new pump will be wired directly to the battery via inline fuse , and relays.


Thanks. Can the FPDM be turned off with the tune?


Sent from my iPhone using Tapatalk
 
I have a thread for you too read on keeping the fpdm if going return style I just can't remember the reason. Ill look for it
 
It's been a while since I posted in this thread. The wife and I had a nice Christmas present, a baby boy!

ImageUploadedByTapatalk1420932174.756366.jpg

Progress on the engine work and swap has been slow, but I am starting to feel like I can pull this off.

This is my DD so I am trying to limit downtime. In the big picture, my current plan is to install the new engine in my SB and break-in the engine (no tune) for a few hundred miles. When I install the engine I'll also install a new stall converter. After ensuring everything works I'll finish the return fuel system, install the centri, get a base tune so I can drive to the tuner and then I'll get the car dyno tuned. This way I can do a proper engine break-in and by doing the work in stages I can ensure everything works before I move on to the next stage. Is it okay to break in the engine with a new converter without having it retuned?

On the fuel side of things, I’ve decided to use part of the donor car evap line as the feed line for the return system on my new setup. I had to cut the pipe in 3 sections and bought a 37 degree flaring tool kit. I actually tried various kits, none of them were very good, but I managed to get a few lines completed. I also decided to do things a little different. I'll have a "dead head" return system in one of the fuel rails. I'll illustrate this and some of the other progress soon.


e8685688a66b8eccdb5f083d06f461a3.jpg


Okay, maybe not really a "dead head". Here is what I have in mind for the return fuel system. I know it is out of the norm, but I am willing to give this a shot. My intent here is to simplify things and utilize the stock fuel rails. The feed line from the fuel tank is -8AN. Then it Tees to -6AN lines to feed each fuel rail. The fuel rails will retain the FRPS and what used to be the inlet tube on the passenger side. The inlet tube will be the start of the return line. BTW, the ID of the fuel rail is just short of 3/8" so the two rails should keep up nicely with the -8 line

attachment.php


EDIT: Fuel Rail Tee
Here are a couple of picture of the fuel rail tee. It worked out pretty well.

985d6e9723ae580ad55a478d62cb7749.jpg


e3fb2f73ceede8f7f17182ec47065a2e.jpg


I also started working on the fuel hat. I did what I've seen others here do. One slight difference is I bent outward the aluminum pipe that will serve as a return line. I want to keep the hot fuel returning from the engine away from the pump pick up point if possible.

cc6a4ac623cb3b6782e67644c027f5fd.jpg


e04444b68038842bc41fa23729837c70.jpg


UPDATE - Fuel Regulator
I am thinking the fuel regulator will end up here:
4585af3915a15e6a43f8dd3b352c7d90.jpg


Here is a picture of how the engine sits at the moment. I want to align the SC pulleys and make note of the setup. Then I'll remove the SC prior to installing the engine. I still need to clock the SC. Also note the single bolt tensioner on the drivers' side. I haven't figured out how ill secure this

e5bacf00eb77daed2cb56c39f14ed7b4.jpg
 

Attachments

  • Return Fuel Sys with Stock Rails.JPG
    Return Fuel Sys with Stock Rails.JPG
    31.2 KB · Views: 150
Last edited:
Heads are stock, intake is stock, fuel system and fuel injectors will be stock, MAF and cold air intake is aftermarket, but the car has been tuned accordingly. The only thing that will be different is the stroker block and 8-rib pulley system


Sent from my iPhone using Tapatalk
 
Cam Degreeing

Here are two links that helped me a lot. The FIRST ONE is on cam degreeing in general. The SECOND ONE, courtesy of nasvt, is on how to use the secondary Cloyes adjustable gears. Also, here is a video on how to remove the rockers arms with a screw driver:


First I installed the Cobra 98 intake cams without degreeing to see where they were at in their stock position. I also attempted to check piston to valve clearance (twice) using modeling clay, but I didn't do a good job first placing the clay and then pealing off the clay and didn't want to install/remove heads and timing components again. I didn't get a good reading here.

6d74d02e9315088a3e708d34e0bb343d.jpg


c02ffe4016fd6d544654b16d96807b31.jpg


Then I used Trick Flow adjusting gears (at the crank) mostly to bring the left and right exhaust cams to the same degree and used Cloyes adjustable gears (at the cams) to advance the intake cams.

These are the gear parts I bought.

66805242bfbab7b675dcffeba32d9dc8.jpg


I ended up with the intake cams at a 113 LC and the exhaust cams at 112. HERE is a good web page to plot your cam positions. This is what mine looks like.

4d286083d35f74186906b6e150b57070.jpg


I went cheap with the tools. I used a home made cardboard degreeing wheel and a HF dial indicator. No cam holding tool, crank chuck, etc.

d6561929fd7d9fbcd24d5d06c9793b71.jpg


69d9aa6dbb5f37a57e737c93a7276d16.jpg


I also changed the timing guides.

330f4a4f17d1a8ebbcae0b3e8e0ca49a.jpg


Sent from my iPhone using Tapatalk
 
Last edited:
Today I started the cooling mod. Below is what I understand is one of the most popular layouts.

d61b88d8185d4627df3a4d91f1398230.jpg


Removal of the plugs was easy. I noticed some dry epoxy in the holes. Some fell inside the intake. It was easy to vacuum the stuff out.

6cb60d0127d71cf7b7ce0602febe7db0.jpg


6ce6a38f1fd7e20601e4feb3fc288c9b.jpg


The passenger side fitting wouldn't fit in the hole properly. I had to grind a corner of the intake to make it fit.

9c0c0687d706780bfcbdd00bd5f16da7.jpg


f2b28efc29761eaef29248f6e70c0615.jpg


Now that both fittings fit properly I wonder if RTV is sufficient to hold these things in place while I am still messing with things. I think I'll just finish this after I am done with the intake and fuel rail work.

48c7d71ba791168b4dfc9f651fdb6038.jpg


UPDATE:
I added some small fasteners to hold the cooling mod fittings in their proper location so I don't bump the fittings out of place as I move hoses and other things during engine installation. It felt like RTV or silicone alone wasn't going to do the job.

8868396f85ac96f39db568524b9c9323.jpg


7fc03478236dc1570557eaab3fd34919.jpg
 
Last edited:
Power Pipe.

As with most things, I didn't know how to go about the inlet pipe and filter. A few of you opened my eyes to how important this part is to a good centri setup. I did a bit of reading and noticed a few other people that saw big HP increases after removing their inlet piping/filter obstructions at the dyno.

So I am thinking of going with a short 5" 30-degree bend pipe and a relatively good size filter. For this I'll need a 5" to 4" reducing elbow and an insert to fit the elbow on the 3.75" Procharger inlet.

With the 30 degree bend I am hoping to be able to turn the filter away from the front of the car to gain more space for a bigger filter. The pictures below from BigM460 help illustrate, except that he has a straight 5" pipe.

Ah yes, I almost forgot. I understand the first order of business is to install the fan upside down to create space for all this stuff. Correct?

Thoughts?


attachment.php


attachment.php


attachment.php


attachment.php


attachment.php


UDPATE:
I bought the silicone 5" to 4" reducing elbow and the 30 degree 5" pipe. I was able to clamp the elbow to the 3.75" Procharger inlet without the 4" to 3.75" reducer shown above. Here is what the setup looks like.

86868dc83e2f4fa4169c6e971bba77e3.jpg


7365ffde454cb975bf3394e425f5d07c.jpg
 

Attachments

  • 5-Inch - 30 Degree Inlet Pipe.JPG
    5-Inch - 30 Degree Inlet Pipe.JPG
    62.3 KB · Views: 146
  • Reducing Elbow for Blower 5 to 4 Inch.JPG
    Reducing Elbow for Blower 5 to 4 Inch.JPG
    87.2 KB · Views: 152
  • Insert for Procharger Inlet.JPG
    Insert for Procharger Inlet.JPG
    34.9 KB · Views: 148
Last edited:
Unless its a stock rebuild , it won't start with a stock tune.

Yes it will.

The passenger side fitting wouldn't fit in the hole properly. I had to grind a corner of the intake to make it fit.

9c0c0687d706780bfcbdd00bd5f16da7.jpg


f2b28efc29761eaef29248f6e70c0615.jpg

Did I make that? If so I apologize. I can't recall installing the 90 degree fitting in the center of the freeze plug, unless it was a really long time ago.
The T fitting normally goes to the drivers side, due to clearance reasons.
 
Yes it will.

I am so relieved to see it will.

Regarding the fitting, it was such a small conflict, not a big deal. I am testing to see if I can keep the Tee fitting on the passenger side for hose routing reasons. We'll see how it goes.
 
I am so relieved to see it will.

Regarding the fitting, it was such a small conflict, not a big deal. I am testing to see if I can keep the Tee fitting on the passenger side for hose routing reasons. We'll see how it goes.

Be relieved when it actually happens! On a stock tune ill believe it when I see it.
 
Be relieved when it actually happens! On a stock tune ill believe it when I see it.

A few posts up he stated he would be starting the engine and breaking it in without a blower.


And OP, there is absolutely NO NEED to break the engine in. NONE
 
Be relieved when it actually happens! On a stock tune ill believe it when I see it.


You may be right, I'll be relieved when it runs.

What is it in your opinion that would cause an issue? By understanding the potential issue, I may be able to advert it. The fuel, intake, MAF, etc will be the same as in my current tune, which by the way is not stock.

As far as starting the engine without the blower, it is also so I can do the work in phases and test each phase before going to the next. I am trying to avoid having an issue at some point and not knowing wether it was fuel related, blower/MAF related, etc.

Sent from my iPhone using Tapatalk

Here is my suggestion to you get your motor , blower , and fuel system done , and installed!

After you have everything hooked up properly take your car to a competent qualified tuner , and let them handle the tuning portion of it , i think your making this more difficult than it needs to be.
 
Here is my suggestion to you get your motor , blower , and fuel system done , and installed!


After you have everything hooked up properly take your car to a competent qualified tuner , and let them handle the tuning portion of it , i think your making this more difficult than it needs to be.


That was plan A. Maybe you guys have a point. The logistics of getting the engine and SC all done in one weekend for a noob like me got me thinking of different options. We'll see.


Sent from my iPhone using Tapatalk
 
Last edited:
I haven't measured my available space yet, but this is the filter I've been looking at.
http://www.horsepowerfreaks.com/partdetails/Greddy/intakes/air_filters/Airinx/9245
Or I'll just run the squirrel catcher it came with and add some finer mesh screening.


Builder Of Badassery


Ah the mushroom filters. I thought those were not good at all. Are they making good ones now? The idea is good, but I think the product and quality wasn't there.


Sent from my iPhone using Tapatalk
 
Back
Top